
Hey friends, today I will show you how to make a simple Glowing Wings photo effect in Photoshop. This tutorial is perfect for those of you who are just learning Adobe Photoshop. because we will use basic tools to create this effect.
In this tutorial I will show how to make wing shapes using the Pen tool, and convert them into white lines through Stroke Path. we will also use Outer glow to create a glowing effect.
Let’s get started!
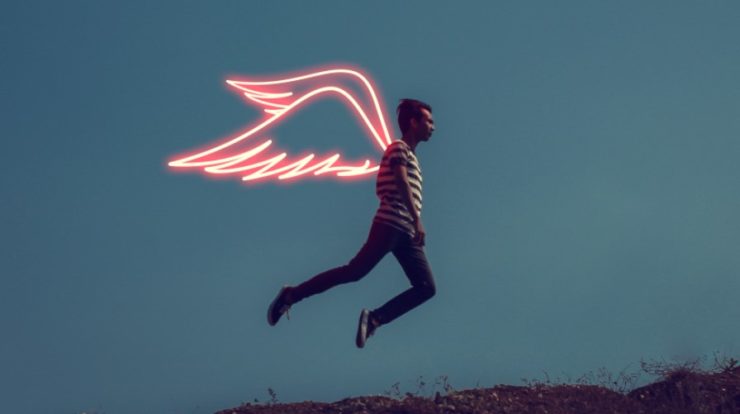
Step 1: Open your image
Start by opening your image. go to File> Open then select the image file, You can also drag and drop your image into Photoshop. I’ll use this image from Pexels:

Step 2: Open the Curves
Go to Image> Adjustments> Curves, or you can press Ctrl+M on your keyboard to pop up the curves panel. we will darken the image, so lower the center of the curves as shown below:

Step 3: Set the Brush tool
Select your Brush tool or you can press B on your keyboard, then Right click to pop the brush panel settings and select Hard round brush and set the size about 15-20 px, don’t forget to change the Foreground color to White:
Step 4: Create the Wing
Create a new layer and rename it as wing. Select the Pen tool or you can press P on your keyboard:

Start making a wing-shaped line directly behind the Man. when you done, Right click on the line and select Stoke Path, change the option to the Brush tool and then click Ok:

Step 5: Create another Wing
Duplicate the Wing layer or you can press the shortcut Ctrl+J on your keyboard, then press Ctrl+T to transform and resize the Wing copy layer. You can remove some unwanted parts using the Eraser tool (E).

If you done, right click on that layer then select Merge down. it will make these two layers merge into one layer:

Step 6: Add Outer Glow
Right click on the Wings layer then select Blending options to pop up Layer style panel. You can also double-click the layer to do it. check the Outer Glow setting then change the color to Red. set the size to 51, or you can adjust it according to what you want. press OK when you done:

Step 7: Add Color Reflection
Select the Man layer then select the Object selection tool (W), then hold and drag your cursor from top left to bottom right to select the Man, you can see the picture below.

After that, create a new layer then select the soft Brush tool and change the color to Red. Draw on the back of the man as shown in the picture then change the Blend mode to Soft Light:

Step 8: Add Color effect
If everything looks good, it’s time to give a color effect to the image. Select the top layer, then create a new adjustment layer Levels. when the levels panel is opened, select the Blue channel and set the Shadow output level to 40 and the Highlight output level to 225:

So that’s how to make the Glowing Wings effect in Adobe Photoshop. I’m sure you can make this effect easily even if you are just learning. If you have difficulty in this tutorial ask by commenting below.


Like!! Great article post.Really thank you! Really Cool.
looks simple but very difficult for me 😀